

How To Change Shirt Color In Photoshop
Learn How To Change Color In Photoshop
If you want to learn how to modify colors in Photoshop, at that place are a few great tools you'll want to remember. In this article, I'll cover how to change any color in Photoshop using 3 dissimilar methods.
Learning how to change colors in Photoshop is extremely like shooting fish in a barrel once you sympathize how to use the hue saturation adjustment layer. Today I'll share how to master the hue saturation adjustment layer, isolate specific colour ranges, turn colors into a choice, and even change white into a different color in Photoshop.
Let's go started!
How To Change And Supersede Colour In Photoshop – Video Tutorial
If you prefer written tutorials, proceed on beneath!
1. Using The Hue Saturation Adjustment Layer To Modify Color In Photoshop
The hue saturation aligning layer is the easiest color changing tool in Photoshop. This tool works by breaking down your photo into different color values that can be contradistinct by hue, saturation, or lightness.
Between these iii sliders, you can change virtually any colour in your photograph with extremely minimal effort.
How To Select And Supplant A Colour In Your Photo Using The Hue Saturation Adjustment
When you first open the hue saturation adjustment layer yous will be sitting in the master channel. The master channel will bear on all the colors in your photo. For example, if you change the hue slider values, you'll alter every color hue in your photograph. Encounter below:
Pace 1: Select A Color Range To Affect
The principal aqueduct will be really useful if you desire to change all the colors in your photo at once. This tab will non work to accommodate specific color ranges.
To adapt a specific color range y'all'll demand to select an individual color channel. Click on the chief tab to reveal the other color channels.
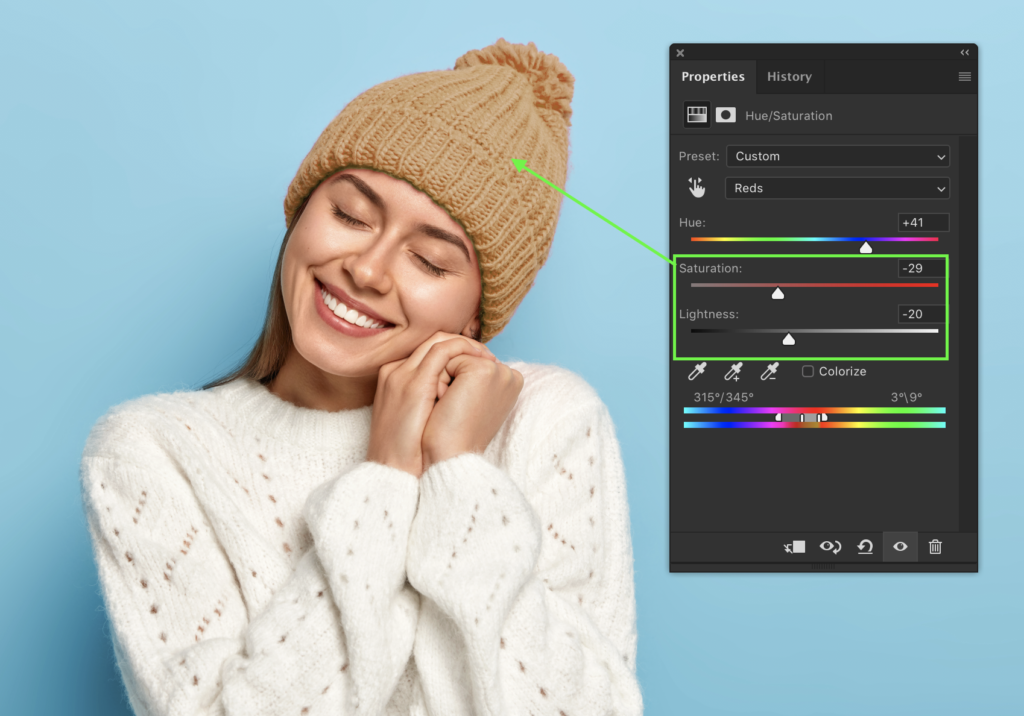
In this example, I want to change the color of the pink toque. Pinks often sit down in the reddish channel so I will select that 1.
Pace ii: Boost Saturation To +100 To Run across Which Colors Are Being Afflicted
It's nearly incommunicable to know exactly what a specific color range is affecting. That's where the saturation slider becomes very useful.
Boost the saturation slider to +100 to make all the colors in that aqueduct extremely saturated.

In this instance, you can see how the saturated areas are on her face, toque, and sweater. At this point, adjusting the hue slider would change the hue of all these saturated areas.

Since I don't want to affect the colour of her peel or sweater, I'll demand to arrange my color range. Below the lightness tab, there is a colour range slider. This slider dictates what specific areas are being selected in a colour aqueduct.
Stride 3: Adjust Color Range Slider
Since I'k using the reds channel, the color range slider sits among the reds and similar hues. To help get rid of the saturation around her face, I'll move the slider away from the yellows to adjust the selected color range.
With a little bit of refining, you can more accurately select a color range using the color range slider in the hue saturation adjustment layer.
Step 4: Adjust Color Hue
Now that yous have adjusted the color range, you're ready to start irresolute some colors!
Go upwards to the hue slider and drag it around to find the color-changing effects yous're looking for. In this case, I want to pick a calorie-free brown color.

One time I have changed the hue to something more orangish, I tin use the saturation and lightness sliders to farther adjust the expect of my color.
Together, these 3 sliders really help to create the exact look you're going for.
Things To Remember When Using The Hue Saturation Adjustment In Photoshop
Depending on how wide your colour range is, you may find a loss of quality if yous push button the hue of your colors from one side to the other.
This loss of quality tin be seen by grain, noise, or most often, banding. See beneath:
The hue saturation adjustment in Photoshop is best used to change the overall colour in your photos. Although yous tin isolate color ranges, this tool is all-time used for more general adjustments where you don't need to be as well specific.
For example, I dear to use this tool when I am wanting to change the colors in my mural photos and portraits. Information technology helps me to accommodate the mood of certain aspects in my photograph.
Overall, the hue saturation aligning tool in the easiest way to change a colour in your photo in Photoshop. If you felt a little overwhelmed or dislocated, brand sure to check out my video tutorial on mastering this tool. Now let's dive into a couple more methods.
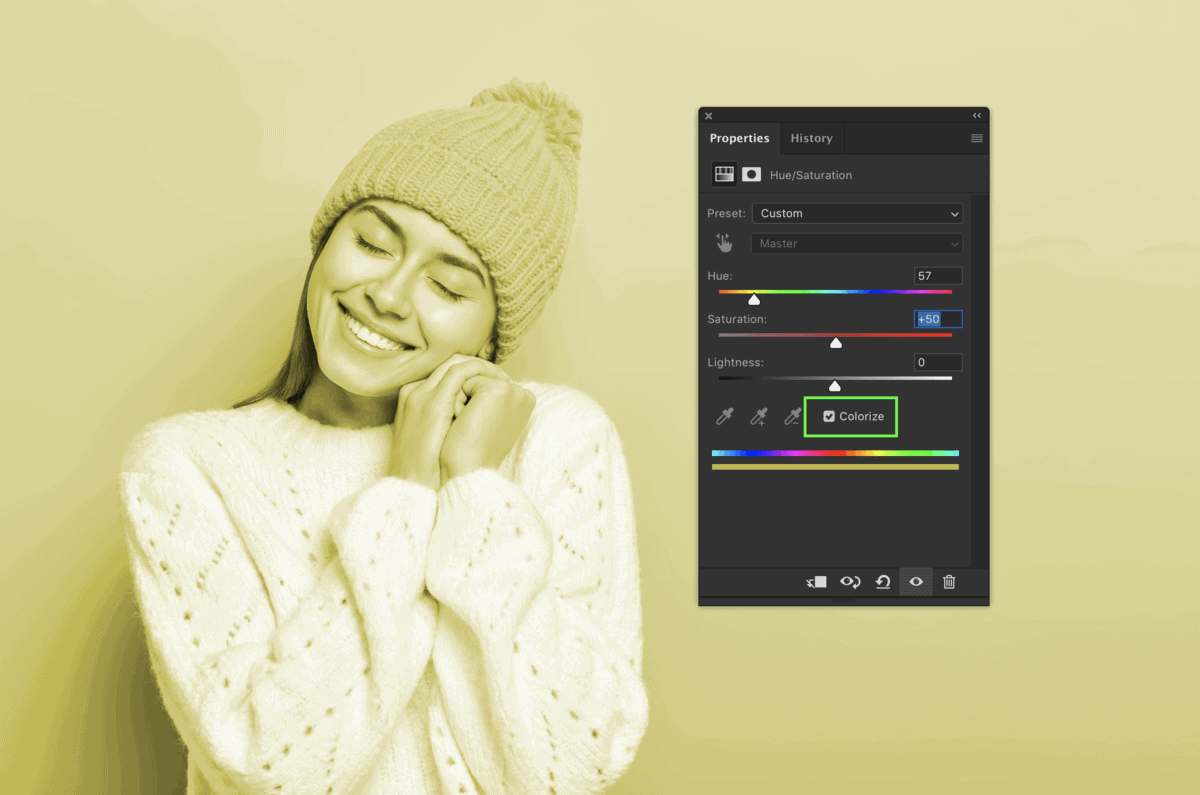
2. How To Change Color In Photoshop Using Colorize
The colorize tool can be establish once again through the hue saturation adjustment layer. Rather than going to modify the color of a specific color range, the colorize tool applies a single colour hue over your entire image.
Colourize works great to modify the colors of backgrounds or clothing in your photo.
How To Alter A Color In Photoshop With Colorize
Since the colorize tool will apply a single color hue over the whole photo, you want to outset brand a selection of the color range you want to affect. In this example, I want to alter the background colour of the photo. Luckily there's an piece of cake tool to make this selection painless.
Step 1: Select Your Color Range
To accurately select my background color, I can employ a smashing color selection tool chosen 'Select Color'. This tool allows yous to sample a colour range and turn information technology into a pick.
To admission the select color go up to SELECT > COLOUR RANGE.

A dialogue box volition appear and your eyedropper tool will be automatically selected. You can click on whatever colour in your photo to sample it, but notice how it changes the preview.
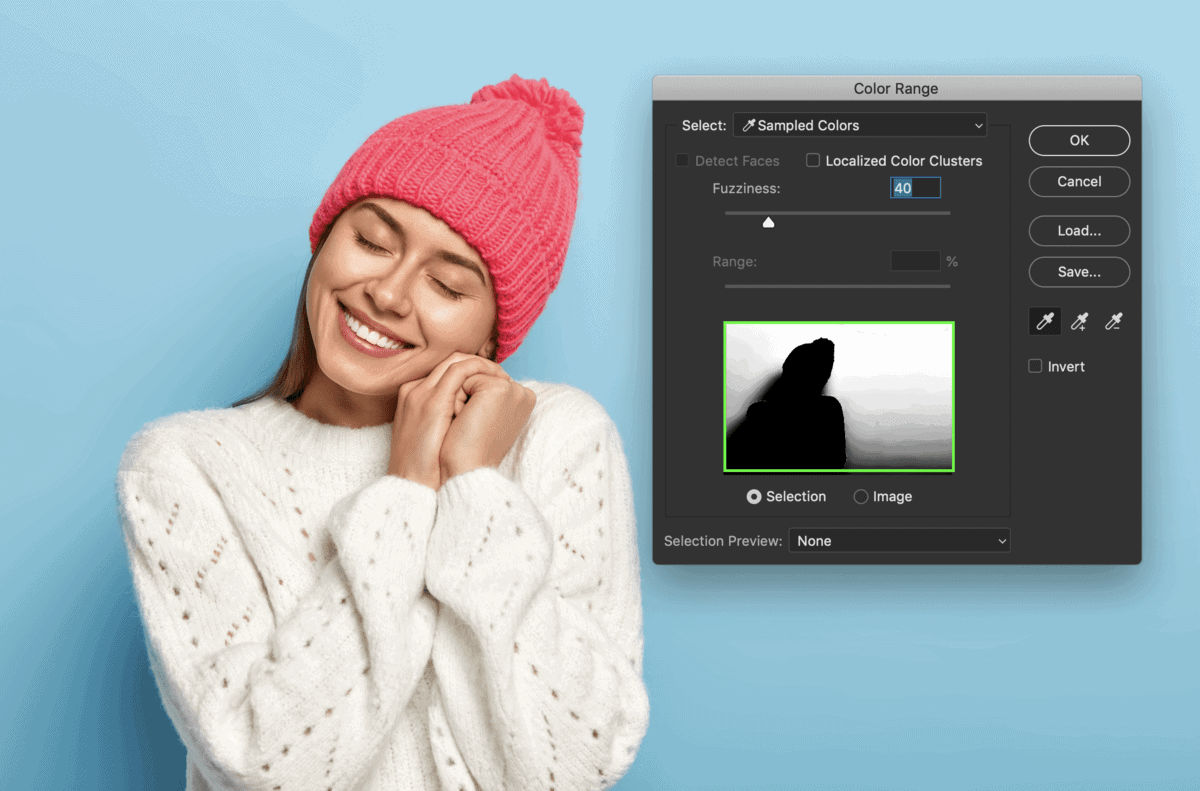
The preview represents the selection you lot are working to create. Try to call back of it similar a layer mask where black in 100% transparent and white is 100% visible.
In one case you cull your start sample, you tin add together to it by holding SHIFT and clicking effectually the photo. You lot can too click on the eyedropper tool with the plus located in the select color dialogue box if shortcuts aren't your thing.

Go on clicking around your image until the desired color range is completely white. In this case the background of the photo.
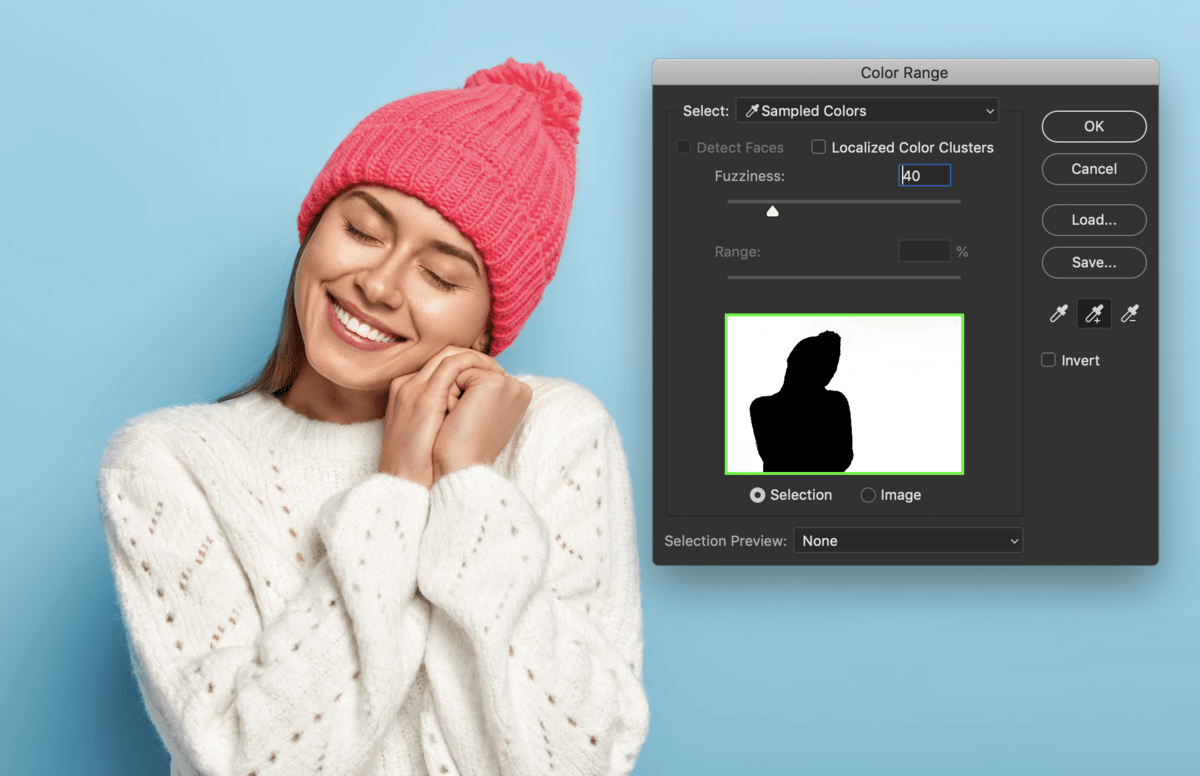
Pace two: Adjust Fuzziness
The fuzziness is the amount of tolerance in your sample. The higher the fuzziness, the more similar colors volition appear in your selection.
For this case, I will get out my fuzziness at fifty. Play around with this slider to see what works best for you.

In one case happy with your option, press OK.
Step iii: Add together Selection Onto Hue Saturation Adjustment Layer Mask
An active selection will announced around the sampled color range and is ready to exist practical onto a hue saturation layer mask. With your selection active, add a hue saturation adjustment layer to automatically add the selection onto your layer mask.
Step four: Colorize Your Photo
Since I take a layer mask at present isolating my desired colour range, I can easily adjust the color of the background in my photo. Open upward the hue saturation aligning layer and click colorize.

At present adjust the hue to whatever color you run across fit. Only the selected colour from previously volition change color since you have it practical a layer mask.

If any areas are missing, you can pigment white or black onto your layer mask to make whatever necessary adjustments.
How To Modify White Into A Dissimilar Colour In Photoshop
Unfortunately, the above methods won't work to change the color of white. Since white has no hue or colour to change, it'southward going to remain the same color no matter what hue adjustments yous add.
And then how the heck are you lot supposed to change the color?
There's a sneaky workaround that you tin employ to modify white into whatever color using a color fill layer. With a modify in blend mode, yous can make the results wait extremely realistic!
Here'due south how to do it:
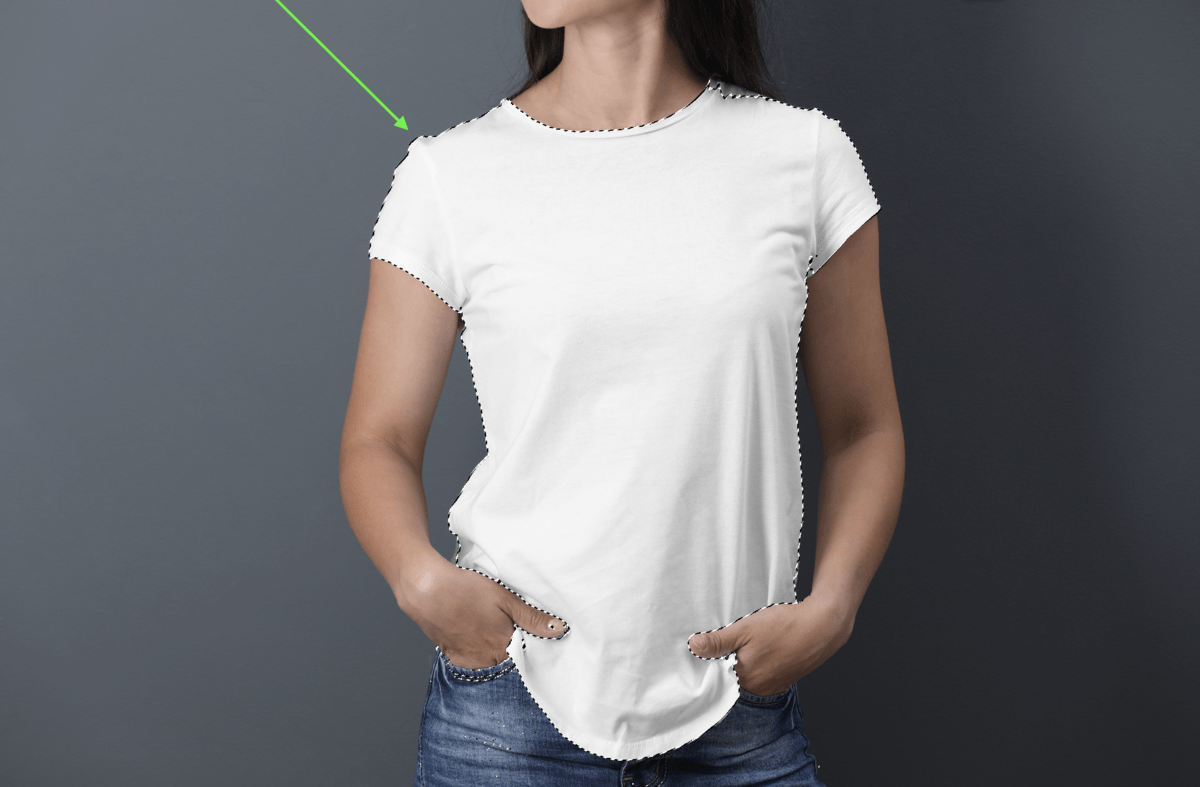
Footstep 1: Select Your Colour Range
Go to SELECT > Color RANGE and select the color you are wanting to change. In this instance, I'll exist sampling the white t-shirt.

Concord SHIFT to add to your sample, and then go on sampling until all of the white is selected. You tin can try irresolute the preview to greyscale to make sampling even easier. Once happy with selection click OK.
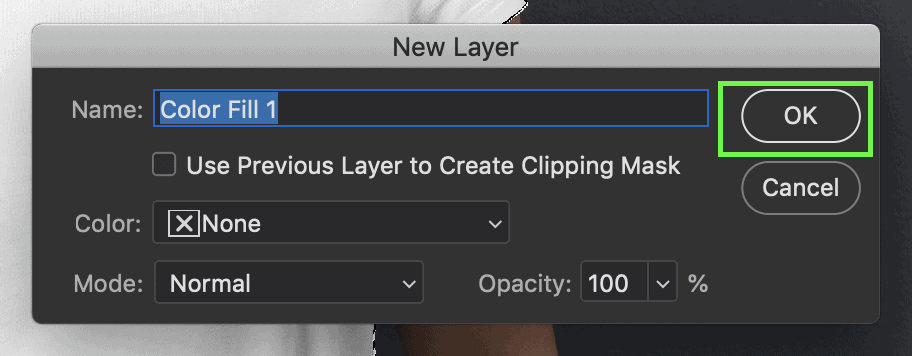
Footstep 2: Add Color Fill Layer
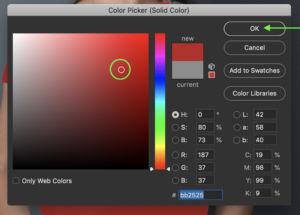
Y'all can create a new color make full layer by going LAYER > LAYER FILL > Colour FILL. Select whatsoever color you lot'd like, you can always change this after.

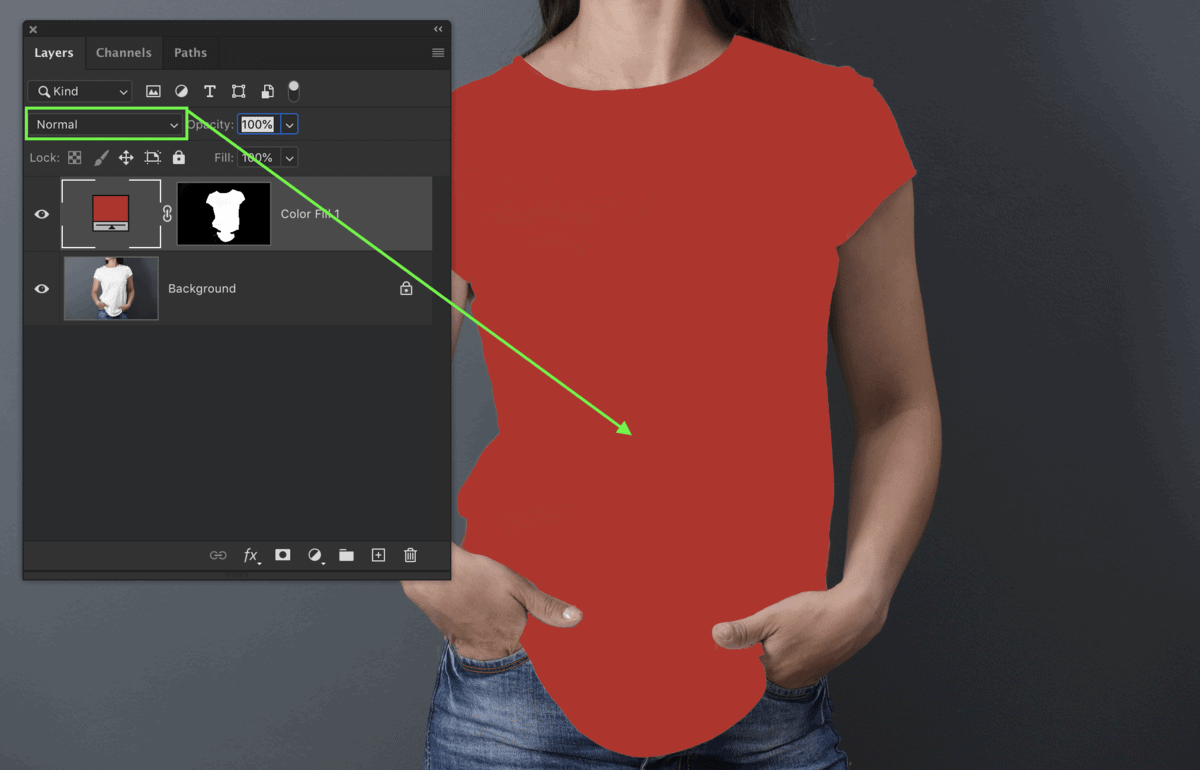
Pace 3: Add Active Selection Onto A Layer Mask
Select the color fill layer and add a layer mask by clicking the layer mask icon at the bottom of the Layers panel.
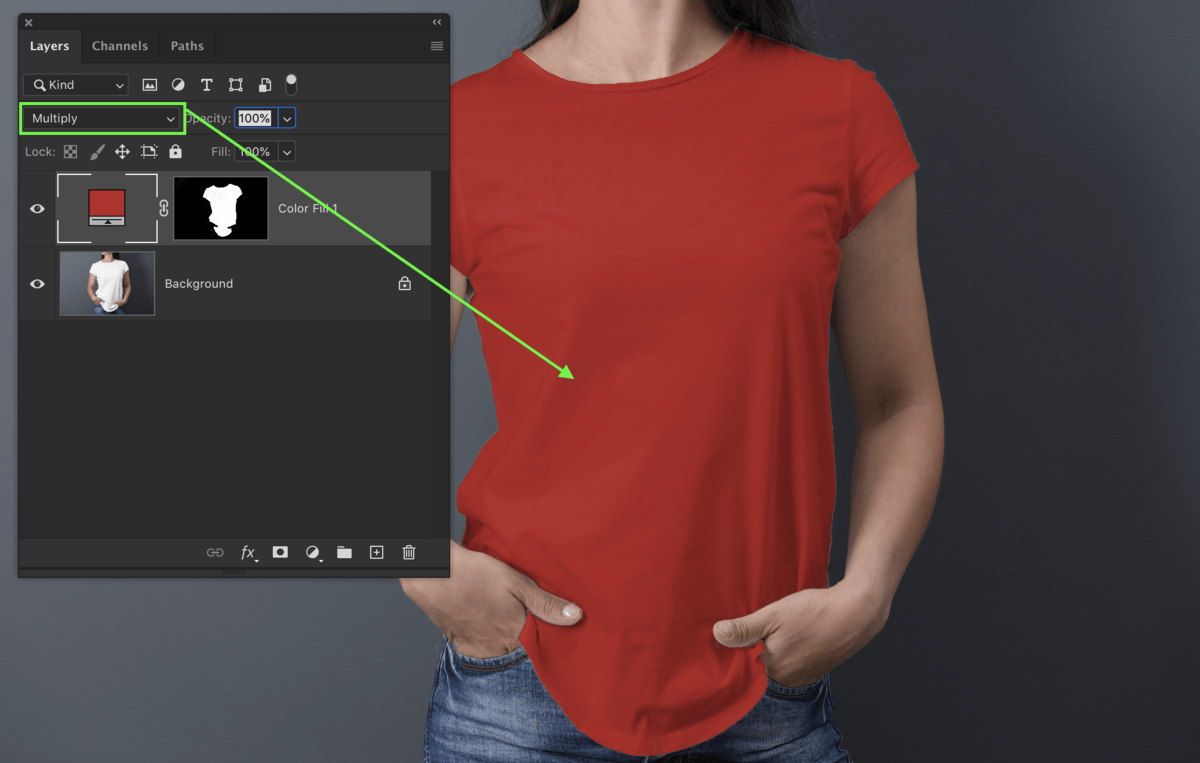
Step 4: Modify Layer Blending Mode To Multiply
Select the color fill layer and modify the layer blending mode from NORMAL to MULTIPLY. This volition permit the lights and darks from the white shirt to bear witness through your color fill layer. This is a cracking way to make the new color look more natural.
At this point, you tin can experiment with a few unlike colors and meet what will piece of work best. Y'all can double click on your color make full layer to change the color of your option at any time.
Last Thoughts On How To Change Colour In Photoshop
Now that you've learned how to change color in Photoshop, you're probably realizing how many options you take.
All the color-irresolute methods nosotros talked virtually in this article are slap-up options to modify the color in any photo. I love to employ all of these methods constantly since some techniques piece of work meliorate for certain images than others.
With a piffling fleck of practice with the hue saturation adjustment layer and select color, yous'll exist able to alter any colour in your photograph using Photoshop in no time!
If you love changing colors and unique color furnishings, yous'll love hearing about a photograph upshot chosen the color splash issue . Rather than changing a single color in your photograph, information technology isolates 1 color and turns the residuum black and white. It'southward an insanely fun outcome that you definitely demand to try!
Learn how to create the colour splash effect hither.
Want more posts like this? Subscribe to my weekly newsletter for more photography and photo editing tutorials delivered straight to your inbox!
Happy editing!
-Brendan 🙂

How To Change Shirt Color In Photoshop,
Source: https://www.bwillcreative.com/how-to-change-color-in-photoshop/
Posted by: morganyiestinne.blogspot.com
0 Response to "How To Change Shirt Color In Photoshop"
Post a Comment