

How To Stack Star Photos In Photoshop
Image stacking is the art of reducing dissonance in images in order to increase clarity of the paradigm elements. Information technology is the sole mode to make certain that the celestial bodies shot appear as clear as possible.

This is a phenomenon used on all types of images. However, it is especially important to make use of prototype stacking on Photoshop for astrophotography because it is the first matter that needs to be done when you lot sit down down to edit these pictures.
Continue reading if you lot want to learn how to stack images in astrophotography. By the time y'all accomplish the determination of this article you will have learned how to stack images in Photoshop. All you have to practise is read our footstep-by-step guide regarding image stacking in Photoshop.
Step 1: Open Photoshop and Load the Images equally Layers
If you frequently practise astrophotography and then you must know to always shoot after setting your camera to save your captures as RAW. Now if yous want to larn to stack images in Photoshop, the first thing you should be informed about is that RAW captures saved in ACR cannot be loaded equally layers into Photoshop.
If y'all want to start using this photo stacking software for astrophotography and so you volition have to load them in the following style:
File > Scripts > Load Files into Stack
By doing so the dialogue box given below will open up. All you lot need to do so is cull all the requires captures and press OK.

Step 2: Duplicating the Images
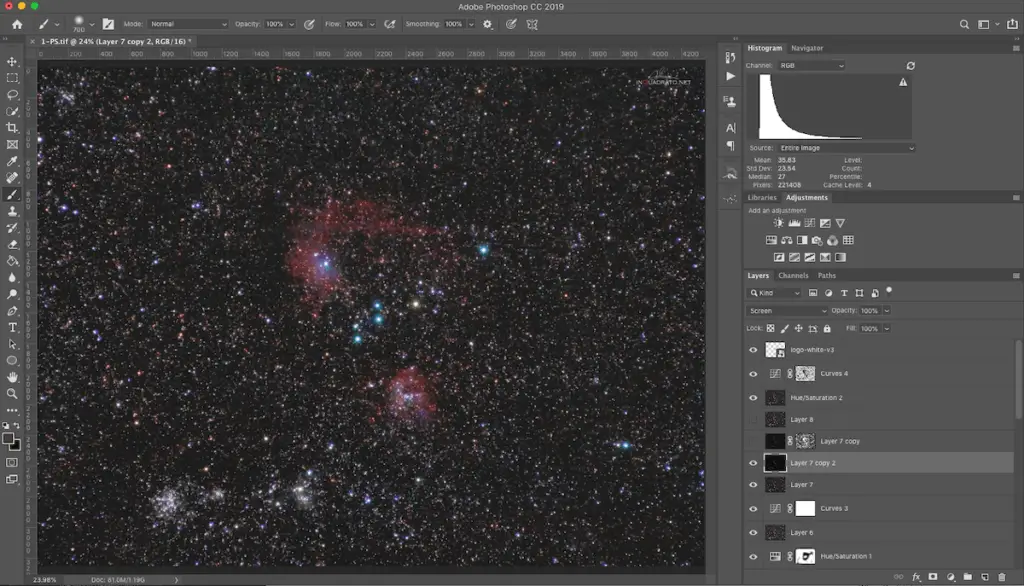
Select all your layers and take them to the icon at the lesser. This should be right near the bin icon on the due south side of the Layers console. Brand a group for these layers and characterization it accordingly by taking them to the binder icon, once more towards the south of the Layers console.
This needs to be washed in the astrophotography stacking software then that you lot have an extra group of captures while photo stacking in Photoshop. These will be used for the background.
Stride iii: Prototype Stacking for Foreground
This is an essential step if you want to learn how to stack images in Photoshop astrophotography. Knowing how to stack photos in Photoshop means knowing how to produce increasingly make clean images. When y'all use astrophotography stacking software to stack images in Photoshop for the foreground the detailing in the captures becomes smoother.
The averaging process makes certain that the bodies in the sky motility wit respect to the foreground. This is washed in accordance with the sequence of your captures.
In order to know how to layer photos in Photoshop properly, this image stacking is pertinent. So follow the two steps given below in order to practice and then:
one. Convert all layers to 'SMART OBJECT' after selecting them (Layer > Smart Object > Convert to Smart Object)
2. Perform averaging on all images in the stack (Layer > Smart Objects > Stack Mode > Mean)
You can see the before and after of this photograph stacking Photoshop step given above.
Footstep 4: Align all the Images
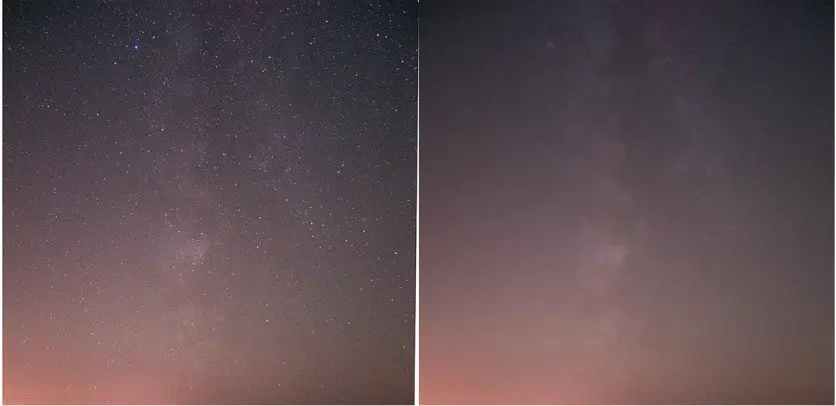
You might accept noticed that in the previous step of image stacking in Photoshop, the sky became smoother just also lost many of its details. You might be wondering why we did that as a office of focus stacking in Photoshop. Well, practise not worry because that was just a step on the mode.
In this step on how to stack photos in Photoshop, we will marshal the images. This will teach you further how to layer photos in Photoshop. The lost details volition be brought back past using another stack.
The commencement thing that needs to exist done is masking the foreground for the group yous created before. This will be washed using a soft brush. Only simply follow the instructions given below.
- Brand sure that the first group you created is the visible layer
- Add together 'LAYER MASK' and so select soft brush
- Pigment the foreground with the black castor
- Press Alt+click to be able to see this
- Brand sure the called color is solid blackness
- Select and copy the mask
- Press Alt and drag the mask thumbnail over all the layers
At present you take a choice between auto aligning and manually aligning the layers in this Photoshop stack mode.
How to Car Align:
- Make all the layers visible
- Select them all
- Layer > Auto-Align Layers
- Select Auto Marshal mode
In case you go an error message, repeat Step three just use 'Median' instead of 'Mean'.
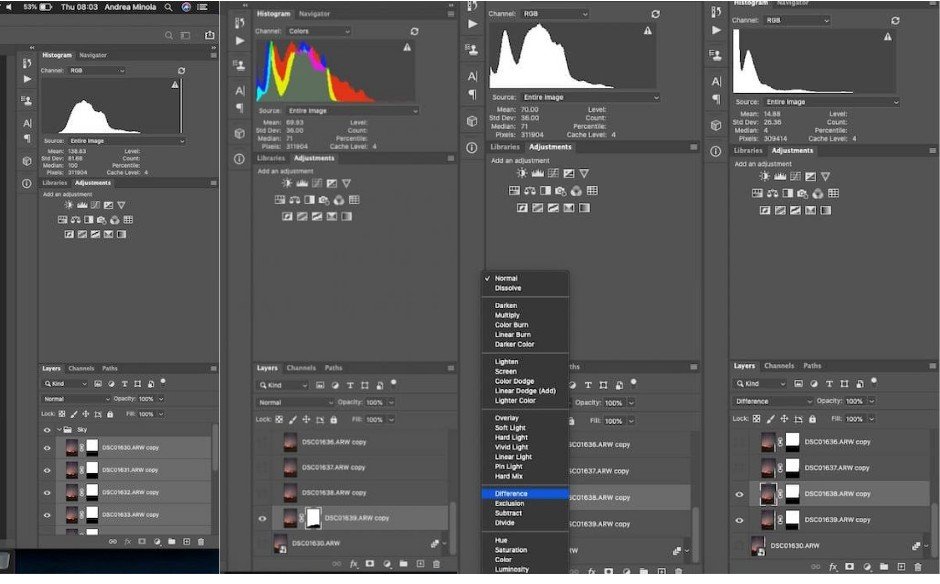
How to Manually Marshal:
- Select a layer of reference
- Start working with two frames
- Fasten the visibility of all the layers in the group (remember to go out out the reference layer)
- Cull 'Difference' from the blending fashion
- You will see black and white parts on the image now, blackness parts being aligned
- Click on the Transform tool
- Deform the layer
- Use Warp mode along with the Transform tool for better results
- Trim the edges at the end
- Confirm transformation
- Brand the blending mode normal once again
- Do the same steps for all the layers
Footstep five: Stack Images and Alloy
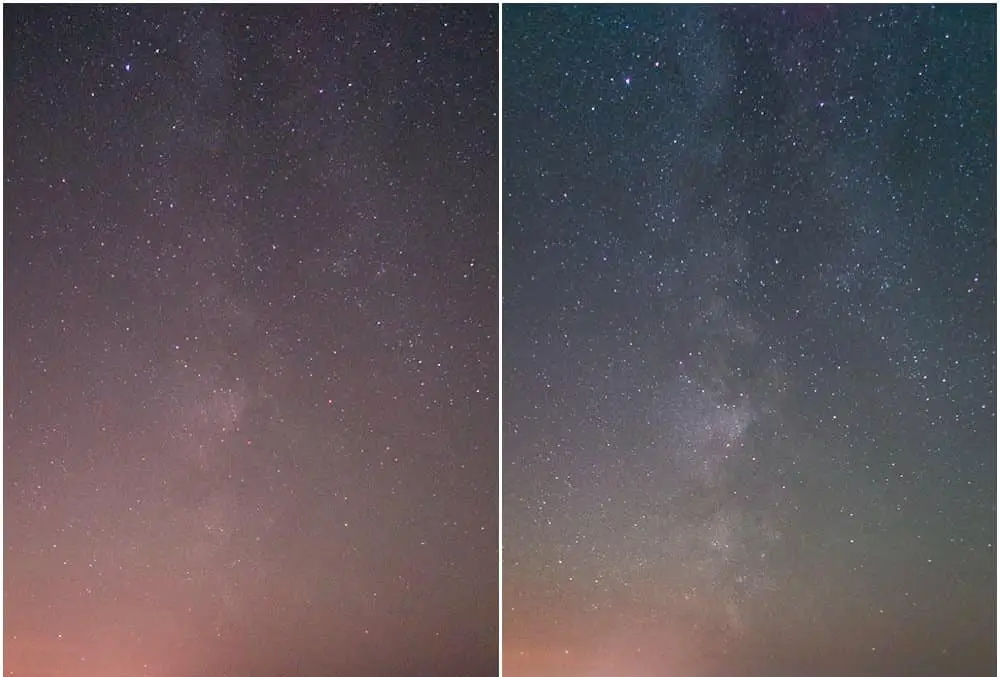
This is the final major footstep you demand to follow in this guide regarding how to stack images in Photoshop astrophotography.
After completing this footstep, the final touches will remain only and you would have learned how to stack images in Photoshop. This is the last of all Photoshop stack modes so you must know how to use photograph stacking software for astrophotography by at present.
Y'all will now stack the created layers in gild to exist able to alloy them with the foreground. This is how to stack photos:
- Reiterate what you did in Step 3 and create a Smart Object
- Toggle on the visibility
- Brand sure the layers are blending perfectly
If you want to larn why information technology is of import to know to stack photos in astrophotography, you can sentry the video below. It will tell you why astrophotographers apply focus stacking for Photoshop. Now that you know how to stack images in Photoshop astrophotography, you should have this information likewise.
Furthermore, if y'all want to know the relevance of Photoshop stacking software in astrophotography, you lot can read up here.
On the other hand, yous tin read this if you desire to learn most the technicalities of prototype stacking in Photoshop.
Determination:
Having reached the end of this ultimate guide on how to stack photos in Photoshop, you must have gained aplenty knowledge to be able to attempt this out yourself. Now you tin can be on your manner to brand your astrophotography photos meliorate than always.
Too, if you liked this article and would like to read more than such articles from our site, you lot tin check out
- Astrology vs. Astronomy
- 6 Best Telescope Eyepieces for Viewing Planets
- All-time Astrophotography Stacking Software
- Author
- Recent Posts
![]()
Author at Dope Guides
I am a Space enthusiast and have been into deep space enquiry for over viii years. Inspired by the likes of Mary Robinette Kowal and others to write great content.
![]()

How To Stack Star Photos In Photoshop,
Source: https://dopeguides.com/stack-astrophotography-images/
Posted by: morganyiestinne.blogspot.com
0 Response to "How To Stack Star Photos In Photoshop"
Post a Comment